|
|
Drawing Tools 5.1 and Later |
The Drawing Tools are available only to users who have licensed Geospatial Analysis 5.1 and later. They enable you to draw various shapes, save them, and use them on Touchstone maps. You may find it helpful to zoom in on the area where you want to draw a shape or shapes before drawing them.
On a map, click in the Map Tools area and
then click ![]() (Drawing Tools). The Drawing Tools pane opens.
(Drawing Tools). The Drawing Tools pane opens.
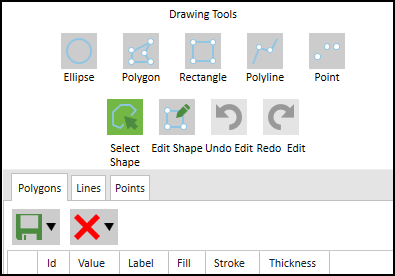
In the Drawing Tools pane, click the shape you want to use and then follow the steps for each shape:
• To define an ellipse, click Ellipse and then click on the map to choose the centroid of the shape. Hold down the left mouse button and drag to draw the shape. The shape outline will be black until you release the mouse button to finalize the shape. The outline then turns to teal, indicating that the shape is in a selected state, as shown in the following screen capture.
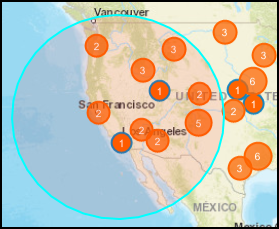
Selected State of Ellipse Shape
• To define a polygon, click Polygon and then click on the map to create the first point. Move the pointer and click on the map to create additional points. The shape outline will be black, as shown in the following screen capture, while you are drawing the polygon, indicating that it is in an unselected state. Double-click to finalize the shape; the shape outline turns to teal. You can only finalize the shape after selecting the third point.
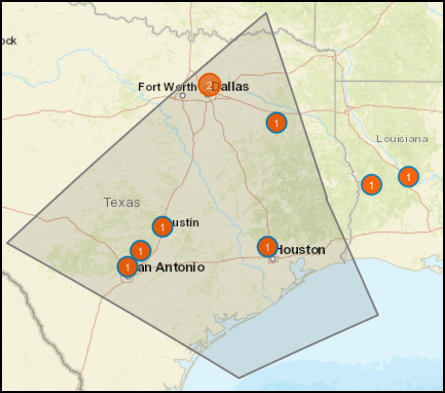
Unselected State of Polygon Shape
• To define a rectangle (or square), click Rectangle and then click on the map to create the first point. Hold down the left mouse button and drag to draw the shape. The shape outline will be black (unselected state) until you release the mouse button to finalize the shape. The outline then turns to teal (selected state).
• To define a polyline, click Polyline and then click on the map to create the first point. Click on the map to create additional points. The shape outline will be teal. Double-click to finalize the shape; the shape outline turns to black. You can only finalize the shape after selecting the second point.
• To define a point, click Point and then click on the map to create the point. The shape outline will be teal. To create another point, click Point again and click on the map to create it. The shape outline of preceding points will be black.
You can perform the following functions.
Click ![]() to reset the toolbar to the default state. This is useful when you want
to clear the map of all the shapes you have been drawing.
to reset the toolbar to the default state. This is useful when you want
to clear the map of all the shapes you have been drawing.
Use this tool to select one or more shapes. This function enables you to save or delete the selected shape or shapes. Click the icon and then select each shape on the map that you want to work with. As you select each shape, the rows in the grid reflect the polygons, lines, and points that comprise the shape. When you select an already selected shape, the shape will be deselected.
Click Edit Shape and then select the shape that you want to modify. The Edit bounding box appears around the selected shape. You can then reposition, resize, and reshape the selected shape.
• To reposition a selected shape, drag the shape to a new location and then release the mouse button.
• To resize a selected shape, point to one of the four red vertices of the bounding box and hold down the mouse button while clicking the vertex. When the point turns yellow, drag it to the new vertex location.
• To reshape a selected shape, you can change a vertex location or add a new vertex to the shape. To change a vertex location, point to any vertex (yellow point), hold down the mouse button while clicking it, and drag the vertex it to the new position. To add a new vertex to the shape, point to the edge of the shape that you are editing. When a new yellow point appears, click it and drag it to the new position.
• To finish editing, double-click on the shape.
You can manage shapes as collections of polygons, points, and lines. When you draw a shape, a record is added to Drawing Tools grid on the appropriate tab (Polygons, Lines, or Points). The following screen capture shows you the record for the polygon drawn on the map.
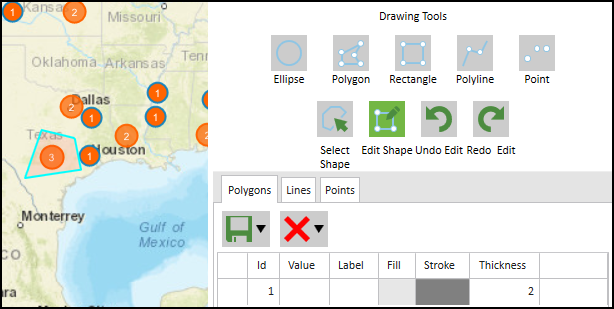
You can modify the properties of drawn shapes by editing values in the grid. When you select a shape, the associated Polygons or Lines or Points tab is selected with the grid populated with the data for the selected shape. For example, select a polygon shape. The Polygons tab displays the value, label, fill, stroke, and thickness values for the shape. For Fill and Stroke data, click in the cell to open the Color Palette window where you can change colors and the transparency (Alpha) level. For Value, Label, and Thickness, enter values in the cell. After editing the values, click the shape to see the edits. For example, on the Polygons tab, click in the Stroke field, select a color, and then click in the shape. You can select a shape by clicking the shape on the map or by selecting one or more rows on any of the tabs in the grid.
You can undo and redo up to the last five edits when you add, remove, reposition, resize, and reshape shapes. You must do this before finalizing edits. For example, you reshape a selected shape by moving three vertex points and then click Undo Edit to revert those changes. Or you may reposition a shape and then click Undo Edit to revert those changes.
To delete selected shapes, select the shape or shapes you want to delete
and then click Delete selected shapes in the
![]() (Delete drawn shapes) list.
(Delete drawn shapes) list.
To delete all shapes, in the ![]() (Delete drawn shapes)
list, select Delete all shapes.
(Delete drawn shapes)
list, select Delete all shapes.
You can save shapes listed on the current tab in the grid.
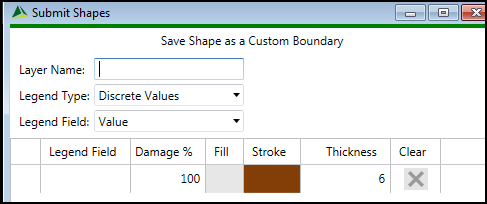
You can save a single shape or all shapes. For example, to save selected polygon shapes, on the Polygons tab, select each row containing a shape or shapes that you want to save and then click Save selected shapes in the Save drawn shapes list. The Save Shape as a Custom Boundary dialog box appears where you can specify layer name, legend type, legend field, damage %, fill, stroke, and thickness. You can also remove (Clear) a segment from the shape. When you have finished defining the shape, click Save.
To save all shapes, for example where you have created multiple points on the map, select the Points tab and then, in the Save drawn shapes list, click Save all shapes.
After you have saved shapes, Touchstone creates a user-drawn Shape Import and adds an activity to the Activity Monitor.
• To select a shape, click it. To deselect a shape, click it again. You can select multiple shapes.
|
© 2020 AIR Worldwide. All rights reserved. Touchstone 7.0 Updated September 03, 2020 |