|
|
Exporting Exposure Views To a Database |
|
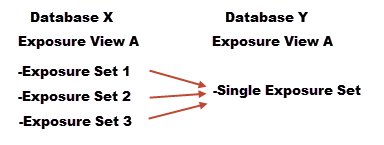
Exposure to Database enables you to export one or more exposure views to a single new or existing CEDE 2.0 database for further analysis or review. Since exposure views can contain one or more exposure sets, this function enables you to merge the exposure sets in an exposure view into a single exposure set. For example, Exposure View A contains three exposure sets (1, 2, and 3) on database X. When you export Exposure View A to database Y, the copy of Exposure View A will contain a single exposure set, which contains all three exposure sets that are in Exposure View A.
Contract IDs must be unique in an exposure set. Therefore, if there are duplicate contracts in the exposure sets that you are exporting, the system appends a suffix to the contract ID. For example, "ContractID129383" becomes "ContractID129383_2". Changing the contract ID does not affect the contract's layers, sublimits, reinsurance, or locations.
The exported exposure views maintain the same structure as the source exposure views except that they reside on a single database. In addition, since Export to Database copies the exposure sets within the selected exposure views, any filters that were applied to the selected exposure views are reflected in the copied exposure sets.
To export exposure views to a database:
1. On the global menu bar, click Export > Exposure > Exposure to Database
2. On the Source Exposure tab, select the exposure view to export.
You can also open AIR ExportExpress, with the export type and exposure view preselected, directly from the Exposure Views list. For more information, see Using ExportExpress. |
AIR ExportExpress does not include results from deleted databases in the grid. |
3. Under Broker Options, select the following options:
a. Excluded Insured Name: Excludes the name of the insured from the exported exposure view or views.
b. Excluded Premium: Excludes premium information from the exported exposure view or views.
c. Export Exposure Views as Single Exposure Sets: Export each selected exposure view as a single exposure set. The newly created single exposure sets will have the same name as the exported exposure views. If an exposure set already exists, Exposure to Database appends a unique numeric identifier to the name of the exposure set, as in "ExpViewA_2".
d. Exclude User Defined Fields (UDFs): Removes all five contract and five location UDF fields. This enables brokers to make the data anonymous before sending it to reinsurers.
4. Select the Options tab and then:
a. In the Database Optimization area, to minimize the size of the target database, select the Shrink database and/or the Disable index on destination database options.
b. In the Database Performance area, select Re-index database if you want to re-index the database. You must select this option if the target exposure database will reside on the same SQL instance. It is not necessary to re-index the database if you plan to use the target exposure database in a new or different Touchstone environment by using the Attach feature in the Data Source Manager.
5. Specify the destination for the exported data.
6. Optionally, deselect Close on Export to keep AIR ExportExpress open after you submit the export job.
7. Click Export.
|
© 2020 AIR Worldwide. All rights reserved. Touchstone 7.0 Updated September 03, 2020 |